

It’s that wonderful time of year here in Heek! The air is getting crisp, pumpkins are appearing on doorsteps, and there’s a fun, spooky feeling building as we head towards the end of October. For me, the best part of any holiday is the festive baking, and there’s nothing more fun than creating some easy, ghoulishly good treats for Halloween.
And the best spooky treats start with a truly amazing base: a perfectly rich, dark, and fudgy brownie made right from scratch. Don’t worry, my go-to recipe is incredibly simple and comes together in one bowl! With this recipe, we’ll transform a simple pan of brownies into a masterpiece—with spooky ghosts and creepy spiderwebs, all using just a few simple tricks.
This is your stress-free guide to creating the perfect spooky centerpiece for your Halloween party or a fun baking project with the kids.
The Perfect Canvas for Spooky Creations
The philosophy behind the best holiday treats is simple: they should be just as much fun to make as they are to eat. And while a box mix can be a great shortcut, there’s nothing that compares to the deep, rich chocolate flavor of a homemade brownie. This recipe is designed to be the perfect “canvas” for your decorations.
It creates a brownie that is dense and fudgy (not cakey), which means it holds its shape perfectly when cut and has an intense chocolate flavor that pairs beautifully with the sweet decorations on top. It proves that “from scratch” doesn’t have to mean “difficult.” This simple one-bowl recipe is almost as fast as a mix from a box, but tastes a million times better.
Why These Spooky Brownies are a Halloween Must!
- Incredibly Rich & Fudgy Brownie Base: This recipe delivers an intensely chocolatey, moist brownie that is the perfect foundation for any decoration.
- Super Easy, One-Bowl Recipe: The brownie recipe itself is fast, simple, and doesn’t require any special skills or equipment.
- Fun & Festive Decorating Ideas: The decorating is simple enough for little hands to help and looks fantastic on a party table.
- Perfect for Parties & Make-Ahead: You can bake the brownies in advance and decorate them just before the party for a stress-free treat.
Ingredients & Equipment
For the Fudgy Brownies (The “Real” Recipe):
- Unsalted Butter: 115g (½ cup), melted.
- Granulated Sugar: 200g (1 cup).
- Eggs: 2 large, at room temperature.
- Vanilla Extract: 1 teaspoon.
- Unsweetened Cocoa Powder: 45g (½ cup), sifted.
- All-Purpose Flour: 60g (½ cup).
- Salt: ¼ teaspoon.
- Dark Chocolate Chips: 100g (about ½ cup).
For Decorating:
- Spiderweb Topping:
- 100g (about ½ cup) white chocolate chips or candy melts.
- Spooky Ghost Topping:
- 100g (about ½ cup) white chocolate chips or candy melts.
- Mini chocolate chips for the eyes.
Helpful Equipment:
- An 8×8 inch (20×20 cm) square baking pan.
- A large mixing bowl.
- A piping bag or a small zip-top plastic bag.
- A toothpick or skewer.
Time Estimates
- Prep Time: 15 minutes
- Bake Time: 25-30 minutes
- Cooling Time: At least 1 hour (very important!)
- Decorating Time: 20 minutes
- Total Time: Approximately 2 hours (mostly inactive cooling and baking time)
Step-by-Step Instructions
The most important first step is to let your brownies cool completely!
Part 1: Baking the Perfect Fudgy Brownies
Step 1: Preheat your oven to 175°C (350°F). Grease an 8×8 inch square baking pan and line it with parchment paper, leaving an overhang on two sides to easily lift the brownies out later.
Step 2: In a large bowl, whisk together the melted butter and the granulated sugar. Add the eggs one at a time, whisking well after each addition. Stir in the vanilla extract.
Step 3: Sift the cocoa powder, flour, and salt over the bowl. Switch to a spatula and gently fold the dry ingredients in until everything is just combined. Do not overmix!
Step 4: Fold in the chocolate chips. Pour the batter into the prepared pan and smooth the top.
Step 5: Bake for 25-30 minutes. The brownies are done when a toothpick inserted into the center comes out with moist, fudgy crumbs, but not wet batter.
Step 6: Place the pan on a wire rack and let the brownies cool completely to room temperature. This is crucial!
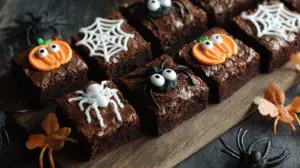
Part 2: The Fun Halloween Decorating
Once the brownies are completely cool, lift them out of the pan and cut them into squares.
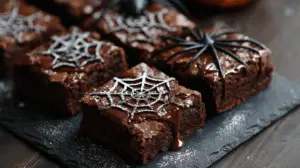
Decorating Idea #1: Creepy Spiderweb Brownies
Step 1: Melt the white chocolate in the microwave in 20-second bursts, stirring in between, until smooth. Step 2: Transfer the melted white chocolate to a piping bag or a small plastic bag with a tiny corner snipped off. Step 3: On top of a brownie square, pipe a spiral of white chocolate, starting from the center. Step 4: Immediately take a toothpick and drag it from the center of the spiral outwards to the edge. Wipe the toothpick clean and repeat this around the circle to create the web effect.
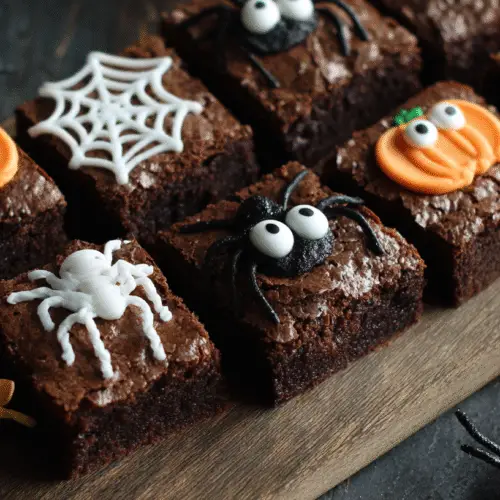
Decorating Idea #2: Ghoulish Ghost Brownies
Step 1: Melt the white chocolate until smooth. Step 2: Take a spoonful of the melted white chocolate and drop it onto the center of a brownie square. Use the back of the spoon to gently spread it out and encourage it to drip down the sides a little, creating a ghostly shape. Step 3: While the white chocolate is still wet, carefully place two mini chocolate chips, pointed-side down, into the “head” of the ghost to create the eyes. Step 4: Let the brownies sit at room temperature until the white chocolate has fully set.
Notes, Tips & Variations
- Completely Cooled Brownies are a MUST: I’ll repeat it because it’s so important. Your brownies must be at room temperature before you start decorating, otherwise, the chocolate will melt into a mess.
- Getting Clean Cuts: For perfect squares, chill the cooled brownies in the fridge for 30 minutes before cutting. Use a large, sharp knife and wipe the blade clean with a warm, damp cloth between each cut.
- Melting White Chocolate: Be gentle with white chocolate. Melt it in the microwave at 50% power in short intervals, or use a double boiler over simmering water to prevent it from seizing.
- Get Creative: Add a few drops of orange, purple, or green food coloring to the white chocolate to create even more festive designs.
Easy & Spooky Halloween Brownies
Ingredients
- Unsalted Butter: 115g ½ cup, melted.
- Granulated Sugar: 200g 1 cup.
- Eggs: 2 large at room temperature.
- Vanilla Extract: 1 teaspoon.
- Unsweetened Cocoa Powder: 45g ½ cup, sifted.
- All-Purpose Flour: 60g ½ cup.
- Salt: ¼ teaspoon.
- Dark Chocolate Chips: 100g about ½ cup.
- For Decorating:
- Spiderweb Topping:
- 100 g about ½ cup white chocolate chips or candy melts.
- Spooky Ghost Topping:
- 100 g about ½ cup white chocolate chips or candy melts.
- Mini chocolate chips for the eyes.
Instructions
- Bake Brownies:
- Preheat oven to 175°C (350°F). Line an 8x8 inch pan with parchment paper.
- In a large bowl, whisk melted butter and sugar. Whisk in eggs and vanilla.
- Fold in cocoa powder, flour, and salt until just combined. Fold in dark chocolate chips.
- Pour into the prepared pan and bake for 25-30 minutes, until a toothpick comes out with moist crumbs.
- Let the brownies cool completely in the pan.
- Decorate:
- Cut the cooled brownies into 16 squares.
- For Spiderwebs: Melt 100g white chocolate. Pipe a spiral on a brownie and drag a toothpick from the center outwards to create a web.
- For Ghosts: Melt 100g white chocolate. Spoon a dollop onto a brownie to create a ghost shape. Add two mini chocolate chips for eyes while the chocolate is still wet.
- Set and Serve: Let the decorated brownies sit at room temperature until the white chocolate has fully hardened before serving.
Notes
- It is absolutely essential that the brownies are completely cool before you begin decorating.
- Wipe your knife clean between cuts for neat brownie squares.
- Get creative and add Halloween-colored food coloring to the white chocolate.
Frequently Asked questions (FAQ)
1. What is the best way to get clean, neat cuts on my brownies? For perfect squares, the key is to let the brownies cool completely (chilling them in the fridge for 30 minutes also helps firm them up). Use a large, sharp chef’s knife or a plastic knife (which is surprisingly non-stick!). After each cut, wipe the blade clean with a warm, damp paper towel. This prevents the fudgy crumbs from dragging and ensures a clean edge every time.
2. Can I make the brownies ahead of time for a party? Yes, absolutely! This is a great make-ahead party treat. You can bake the brownies a day in advance. Keep them uncut in their pan, covered tightly with plastic wrap or foil, at room temperature. Decorate them a few hours before your party is scheduled to start.
3. My white chocolate seized up and got thick and grainy! What happened? This is a very common problem! White chocolate is more sensitive to heat than dark chocolate. It “seizes” when it gets too hot or if even a tiny drop of water gets into it. To prevent this, always melt it gently. In the microwave, use 50% power and stir every 20 seconds. If using a double boiler, make sure the bottom of the bowl is not touching the simmering water.
4. What are some other super easy Halloween decorating ideas for these brownies? You can turn them into “Mummy Brownies” by drizzling the melted white chocolate back and forth in thin lines to look like bandages, then adding candy eyeballs. Another fun idea is to top them with green frosting and sprinkle with Halloween-themed sprinkles. For “Graveyard Brownies,” frost them with chocolate icing, sprinkle with crushed Oreo “dirt,” and stick a rectangular cookie in as a tombstone. The possibilities are endless!
Ready to Get Spooky?
Baking for Halloween should be all about fun, not stress, and these easy brownie ideas are the perfect way to get into the festive spirit. I hope you and your family have a blast making (and eating!) these ghoulishly good treats. I’d love to see your creations! And try my Black Bean Brownies.