

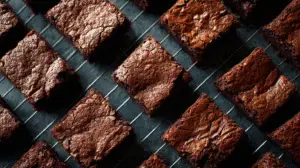
There is an undeniable charm to miniature desserts. They’re cute, they’re perfectly portioned, and they’re incredibly fun to eat. When a serious chocolate craving hits on a busy Tuesday afternoon, I don’t want to bake a whole giant pan of something. I want a quick, easy, and satisfying solution. That solution, my friends, is these amazing Mini Brownies.
These are the perfect little two-bite wonders. We’re taking my go-to, incredibly simple, one-bowl fudgy brownie recipe and baking it in a mini muffin pan. The result? Perfectly portioned brownie bites that are rich and deeply chocolatey in the center, with those delightfully chewy edges that everyone secretly fights over. In fact, with these mini brownies, every piece is an edge piece!
This is one of the fastest and easiest baking projects you can do. They’re perfect for packing in lunchboxes, arranging on a party platter, or just having on hand for a quick chocolate fix. Your whole family is going to adore these.
The Magic of Miniature
Why make mini brownies? For me, the magic is threefold. First, portion control! It’s the perfect way to satisfy a sweet tooth with a small, perfect treat. Second, they are the ultimate party food. They are easy for guests to grab, require no plates or forks, and a single batch makes plenty to share.
Finally, and perhaps most importantly for the texture lovers out there, baking brownies in a mini muffin pan maximizes the surface area, which means you get a higher ratio of those deliciously caramelized, chewy edges to the soft, fudgy center. It’s the best of both worlds in one perfect bite. This recipe uses my favorite foolproof, from-scratch brownie batter that is so simple, you’ll never even think about reaching for a box mix again. It’s the perfect way to create a little bit of joy on a regular afternoon here in Heek.
Why You’ll Make These Brownie Bites on Repeat:
- Perfectly Portioned: These two-bite wonders are the ideal small treat for lunchboxes, after-school snacks, or a guilt-free dessert.
- Maximum Chewy Edges: If you’re a fan of the corner piece of a brownie pan, this recipe is for you. Every single brownie bite has that amazing chewy edge.
- Super Fast Bake Time: Because they are so small, these brownies bake in a fraction of the time of a full pan—we’re talking 12-15 minutes!
- Made with a Simple, One-Bowl Batter: This from-scratch recipe is unbelievably easy and comes together in minutes with no fancy equipment needed.
Ingredients & Equipment
For the Mini Brownies:
- Unsalted Butter: 115g (½ cup), melted.
- Granulated Sugar: 200g (1 cup).
- Eggs: 2 large, at room temperature.
- Vanilla Extract: 1 teaspoon.
- Unsweetened Cocoa Powder (Backkakao): 45g (½ cup), sifted.
- All-Purpose Flour: 60g (½ cup).
- Salt: ¼ teaspoon.
- Chocolate Chips: 100g (about ½ cup), semi-sweet or dark (optional, but recommended).
Helpful Equipment:
- A 24-cup mini muffin pan (
Mini-Muffinblech). - Mini paper liners.
- A large mixing bowl.
- A small cookie scoop (about 1 tablespoon size).
Time Estimates
- Prep Time: 10 minutes
- Bake Time: 12-15 minutes
- Total Time: Approximately 25 minutes (plus cooling time)

Step-by-Step Instructions
This one-bowl wonder is almost dangerously easy to make!
Step 1: Prepare the Oven and Pan Preheat your oven to 175°C (350°F). Line a 24-cup mini muffin pan with mini paper liners. This is the key to easy removal and no sticking.
Step 2: Make the One-Bowl Brownie Batter In a large bowl, whisk together the melted butter and the granulated sugar until well combined. Add the eggs one at a time, whisking well after each addition until the mixture is glossy. Whisk in the vanilla extract.
Step 3: Fold in the Dry Ingredients Sift the cocoa powder, flour, and salt directly over your bowl of wet ingredients. Switch to a rubber spatula and gently fold the dry ingredients in until everything is just combined and no large streaks of flour remain. Be careful not to overmix!
Step 4: Add Chocolate (Optional) If you’re using them, gently fold in the chocolate chips.
Step 5: Fill the Muffin Cups Use a small cookie scoop (about 1 tablespoon size) or two spoons to portion the batter into the prepared mini muffin cups. Fill each liner about ¾ of the way full. Do not overfill them.
Step 6: Bake! Bake for 12-15 minutes. The mini brownies are done when the tops are set and a wooden toothpick inserted into the center comes out with moist, fudgy crumbs, but not wet batter. Because they are small, they bake very quickly, so keep a close eye on them!
Step 7: Cool Let the mini brownies cool in the muffin pan for about 10 minutes before carefully transferring them to a wire rack to cool completely.
Notes, Tips & Variations
- Don’t Overfill the Liners: Filling the mini muffin cups about ¾ full is the sweet spot. If you overfill them, they can bake up with large “mushroom” tops and overflow. A small cookie scoop is the perfect tool for uniform, perfectly portioned bites.
- Don’t Overbake: The biggest risk with mini bakes is drying them out. The residual heat will continue to cook them after you pull them from the oven. It’s better to err on the side of slightly underbaked for the fudgiest possible centers.
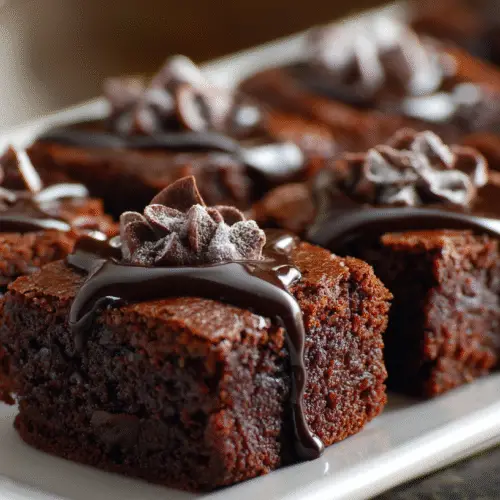
- Fun Toppings and Variations: These little bites are a perfect canvas! You can press a single M&M, a mini peanut butter cup, or a raspberry into the center of the batter before baking. After they cool, you can also drizzle them with a simple chocolate ganache or a sprinkle of flaky sea salt to elevate them.
- Storage: Store the mini brownies in an airtight container at room temperature for up to 4 days.
The Best Easy Mini Brownies Recipe
Ingredients
- 115 g ½ cup unsalted butter, melted
- 200 g 1 cup granulated sugar
- 2 large eggs
- 1 tsp vanilla extract
- 45 g ½ cup unsweetened cocoa powder, sifted
- 60 g ½ cup all-purpose flour
- ¼ tsp salt
- 100 g ½ cup chocolate chips (optional)
Instructions
- Prep: Preheat oven to 175°C (350°F). Line a 24-cup mini muffin pan with paper liners.
- Mix Wet: In a large bowl, whisk together melted butter and sugar. Whisk in the eggs one at a time, then the vanilla.
- Combine: Sift the cocoa powder, flour, and salt over the bowl. Fold with a spatula until just combined. Do not overmix. Fold in optional chocolate chips.
- Fill: Portion the batter into the prepared liners, filling each about ¾ full.
- Bake: Bake for 12-15 minutes, or until a toothpick inserted into the center comes out with moist, fudgy crumbs.
- Cool: Let the brownies cool in the pan for 10 minutes before moving them to a wire rack to cool completely.
Notes
- A small cookie scoop makes portioning the batter neat and easy.
- Be careful not to overbake, as the small size means they cook very quickly.
- Top with a chocolate ganache or a sprinkle of sea salt after cooling for an extra special treat.
Frequently Asked Questions (FAQ)
1. Do I have to use a mini muffin pan? The mini muffin pan is what gives these brownies their signature bite-sized shape and chewy edges. If you don’t have one, you can bake the batter in a standard 8×8 inch square pan, but you will need to increase the baking time significantly to 25-30 minutes.
2. How do I keep the mini brownies from sticking to the pan? The easiest and most foolproof method is to use mini paper liners. They make cleanup a breeze and ensure your brownies pop out perfectly every time. If you don’t have liners, be sure to grease and flour each individual cup of the pan very thoroughly.
3. How do I know when the mini brownies are perfectly baked? Because the bake time is so short, it’s important to keep a close eye on them. They are done when the tops look set and are no longer wet. The best test is to insert a wooden toothpick into the center of one of the middle brownies. It should come out with moist, fudgy crumbs attached. If it comes out with wet batter, they need another minute or two. If it comes out completely clean, they might be slightly overbaked.
4. How should I store these brownie bites? Store the completely cooled mini brownies in an airtight container at room temperature. They will stay fresh and fudgy for up to 4 days. Because of their small size, it’s important to keep them well-sealed to prevent them from drying out.
Ready for a Chocolate Fix?
This is one of my all-time favorite “back pocket” recipes. It’s so fast, so easy, and the results are always a huge hit with everyone. They are the perfect little treat to brighten up a regular day. I hope you love them! If you make a batch, I’d love to hear about it in the comments below.
For more easy and delicious baking ideas, be sure to follow me on Pinterest and Instagram. Happy baking! And try out my Cheesecake Brownies.